
TL;DR
To integrate Prerender.io with Nginx, add routing rules to your nginx.conf that intercept requests from AI crawlers and search engines and forward them to Prerender.io's rendering service. The integration follows the same core pattern across three setups: Single Page Application (SPA), PHP application, and Reverse proxy.
ℹ️ Not sure which Nginx setup matches your stack? Ask Nexus, your AI integration assistant, inside your Prerender.io dashboard. Describe your setup and Nexus will recommend the right path and walk you through it.
👉 All example configurations are available in the Prerender-nginx GitHub repository.
Step 1: Create a Prerender.io account.
If you don't already have an account, create one at Prerender.io. Your account gives you access to your dashboard, your token, and cached page reports.
Step 2: Copy your Prerender.io token.
In your Prerender.io dashboard, go to Security and Access > Prerender Token. Copy your token—you will need it in a later step.
Step 3: Back up your Nginx config file.
Before making any changes, create a backup of your nginx.conf file. This lets you restore your previous configuration if anything goes wrong.
⚠️ Always back up your nginx.conf before editing it. A configuration error can bring your server down.
Follow the steps for your use case:
Single Page Application (SPA)
Video Guide:
Step 4: Open the SPA config on GitHub.
Open the Nginx SPA config in the Prerender-Nginx repository. Keep this tab open—you will copy sections from it in the steps below.
Step 5: Add the map blocks to your http block.
Copy the map{...} sections from the GitHub config and paste them inside the http{...} block in your nginx.conf file.
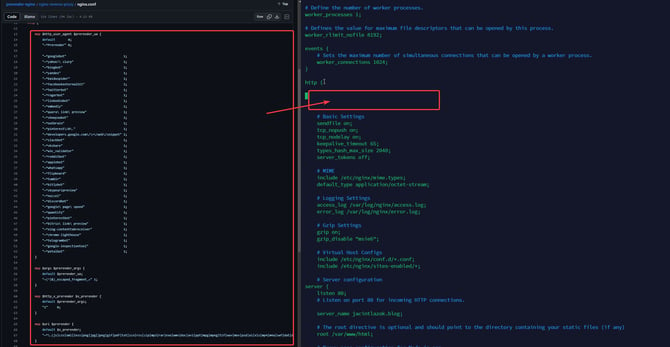
Step 6: Add the Prerender rewrite to your location block.
Add the following code inside your location / {...} block:
if ($prerender = 1) {rewrite (.*) /prerenderio last;}
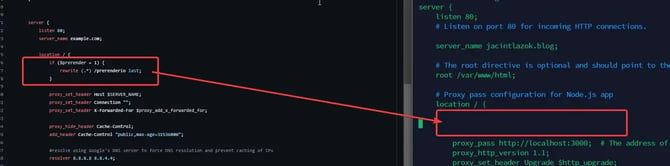
Step 7: Add the Prerender location block.
Add the location /prerenderio {...} block to your server block, directly after the location / {...} block.
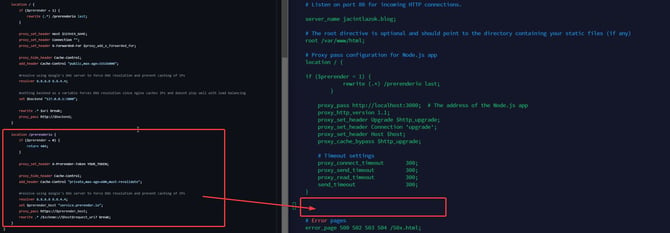
Step 8: Replace YOUR_TOKEN with your Prerender.io token.
Inside the location /prerenderio {...} block, replace YOUR_TOKEN with the token you copied in Step 2.
Step 9: Test your Nginx config and restart.
Run an Nginx configuration test
nginx -tℹ️ If the test passes, restart Nginx. If it fails, check the error output and compare your config against the SPA example on GitHub.
PHP application
Video Guide:
Step 4: Open the PHP config on GitHub.
Open the Nginx PHP config in the prerender-nginx repository. Keep this tab open — you will copy sections from it in the steps below.
Step 5: Add the map blocks in front of your server block.
Copy the map{...} sections from the GitHub config and paste them in front of the server{...} block in your nginx.conf file.
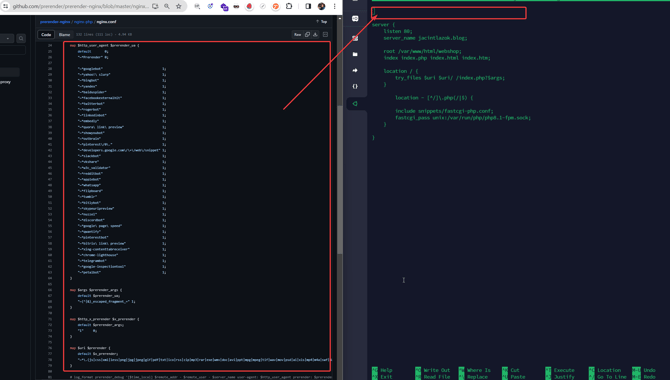
Step 6: Add the Prerender rewrite to your location block.
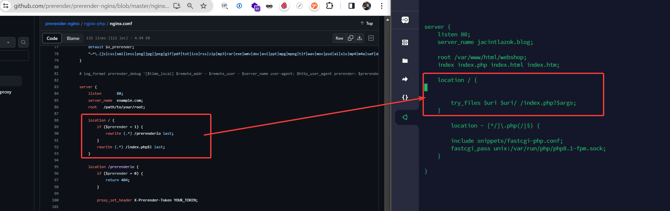
Replace the contents of your location / {...} block with the following:
location / {
if ($prerender = 1) {

   rewrite (.*) /prerenderio last;

}
rewrite (.*) /index.php$1 last;
}
Step 7: Add the Prerender.io location block.
Add the location /prerenderio {...} block to your server block, directly after the location / {...} block.
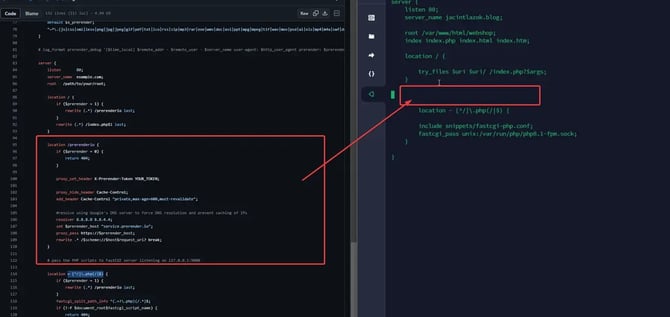
Step 8: Replace YOUR_TOKEN with your Prerender.io token.
Inside the location /prerenderio {...} block, replace YOUR_TOKEN with the token you copied in Step 2.
Step 9: Add the Prerender check to your PHP location block.
Inside your ~ [^/].php(/|$) location block, add the following if statement:
if ($prerender = 1) {rewrite (.*) /prerenderio last;}
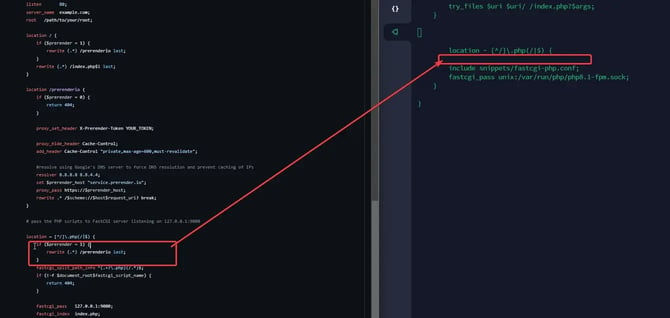
Step 10: Test your Nginx config and restart.
Run an Nginx configuration test:
nginx -tℹ️ If the test passes, restart Nginx. If it fails, check the error output and compare your config against the PHP example on GitHub.
Reverse Proxy
Video Guide:
Step 4: Open the reverse proxy config on GitHub.
Open the Nginx reverse proxy config in the prerender-nginx repository. Keep this tab open — you will copy sections from it in the steps below.
Step 5: Add the map blocks to your http block.
Copy the map{...} sections from the GitHub config and paste them inside the http{...} block in your nginx.conf file.
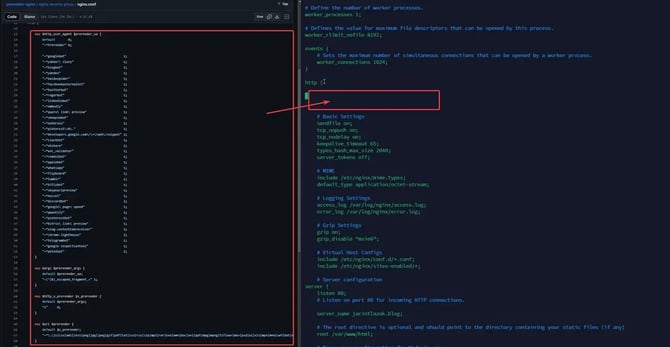
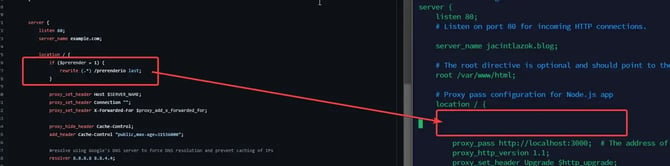
Step 6: Add the Prerender rewrite to your location block.
Add the following code inside your location / {...} block:
if ($prerender = 1) {

    rewrite (.*) /prerenderio last;

}
Step 7: Add the Prerender.io location block.
Add the location /prerenderio {...} block to your server block, directly after the location / {...} block.
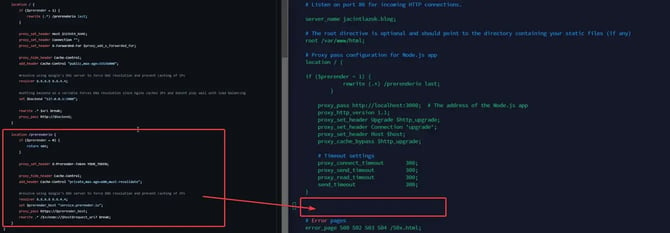
Step 8: Replace YOUR_TOKEN with your Prerender.io token.
Inside the location /prerenderio {...} block, replace YOUR_TOKEN with the token you copied in Step 2.
Step 9: Test your Nginx config and restart.
Run an Nginx configuration test:
nginx -tℹ️ If the test passes, restart Nginx. If it fails, check the error output and compare your config against the reverse proxy example on GitHub.
Verify your integration is working
Confirm that Prerender.io is correctly intercepting crawler requests and serving rendered HTML to AI crawlers and search engines.
➡️ See Verify your integration for step-by-step instructions.
✅ Your integration is working when cached pages appear in your Prerender.io dashboard within 2 to 5 minutes of your first crawler request.
If you see the error "Prerender Integration Not Detected," refer to the troubleshooting guide for integration detection errors to resolve the issue.
Related articles
- How do I integrate Prerender with a Single Page Application?
- How do I integrate Prerender with Cloudflare Workers?
- How to verify your Prerender.io integration is working
- Why am I seeing 403 or 404 errors after integrating Prerender.io?
💬 Still need help? If you have questions about your Nginx integration or run into errors, our support team can help. → Contact us at support@prerender.io