
TL;DR
Create a Cloudflare Worker that intercepts requests from AI crawlers and search engines and routes them through Prerender.io. The Worker checks the User-Agent, forwards bot requests to Prerender.io for a cached rendered response, and passes regular website visitor requests through to your origin unchanged. You need a Prerender.io account, a Cloudflare account with your domain proxied, and Worker Admin access.
ℹ️ Using Lovable? If your site is hosted on Lovable, follow the Lovable integration guide instead — the setup path is different.
ℹ️ Not sure which integration fits your stack? Ask Nexus, your AI integration assistant inside your Prerender dashboard — describe your setup and Nexus will recommend the right path and walk you through it.
Why this matters
JavaScript-heavy sites are difficult for AI crawlers and search engines to read. Without pre-rendered HTML, crawlers may miss or misread your content, reducing your visibility in AI-generated answers and search results. The Cloudflare Worker integration sits at the CDN level, intercepting crawler requests before they reach your server and serving fully rendered, cached HTML from Prerender.io.
Step 1: Copy your Prerender.io token.
- Log in to your Prerender dashboard.
- Go to Security and Access and copy your Prerender token.
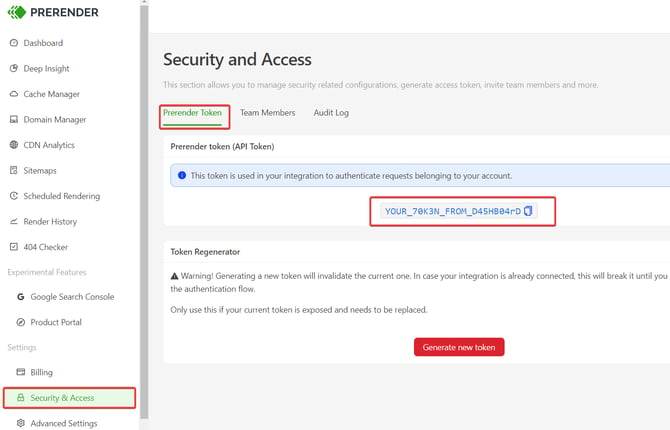
Already logged into Prerender and on the Integrate step? Your token is shown at the top right of the screen. You can copy it from there.
ℹ️ Don't have a Prerender account yet? Sign up at prerender.io before continuing.
ℹ️ Keep your token private — anyone with it can send requests through your Prerender account. You'll add it to the worker as an environment variable in Step 6.
Step 2: Add your domain to Cloudflare.
If your domain is not yet on Cloudflare, you need to add it first.
-
Log in to your Cloudflare dashboard.
-
Click Add a site and enter your domain (for example, example.com).
-
Select a Cloudflare plan (the free plan works for this integration).
-
Cloudflare scans your existing DNS records and imports them. Review the records and confirm they are correct.
-
Cloudflare gives you two nameservers. Update your domain's nameservers at your registrar to point to these Cloudflare nameservers.
-
Wait for nameserver propagation. This can take up to 24 hours, but often completes within an hour.
ℹ️ If your domain is already on Cloudflare, skip to the next step.
Step 3: Set your DNS record to Proxied (orange cloud)
Cloudflare Workers only run on traffic that passes through Cloudflare's proxy network. If your DNS record is set to DNS-only (gray cloud), requests go directly to your origin and bypass the Worker entirely.
- In your Cloudflare dashboard, go to DNS > Records.
- Find the A or CNAME record for your domain.
- Check the Proxy status column. If the cloud icon is gray, click it to switch to Proxied (orange cloud).
⚠️ If you cannot enable proxying for your domain (for example, your setup requires DNS-only mode), the Cloudflare Worker integration will not work. You need a server-side integration instead. See Available integrations to find the right method for your stack.
ℹ️ If you run into issues with the integration while using an A record, replacing it with a CNAME record in Cloudflare should resolve the problem.
Step 4: Allow AI crawlers in Cloudflare
Cloudflare automatically blocks AI training crawlers on newly added domains. If you want AI crawlers to discover and index your content through Prerender, you must explicitly allow them.
- In your Cloudflare dashboard, go to Account Home and select your domain.
- Find the Control AI crawlers setting.
- Set it to Allow so AI crawlers can discover and index your content.
⚠️ Important: As of September 2026, Cloudflare classifies any crawler that does both search indexing and AI training as an AI/training crawler — this now includes Googlebot, Bingbot, and Applebot. If Control AI crawlers is set to Block, it will also block those search crawlers, even though this setting was previously documented as leaving them untouched. If you've had this set to Block, check Google Search Console (or Bing/Apple equivalents) for a drop in crawl activity since mid-September.
ℹ️ For details on how Cloudflare categorises AI crawlers, see Cloudflare's bot documentation.
Step 5: Create a Cloudflare Worker
- In your Cloudflare dashboard, go to Compute (Workers & Pages).
- Click Create and select Create Worker.
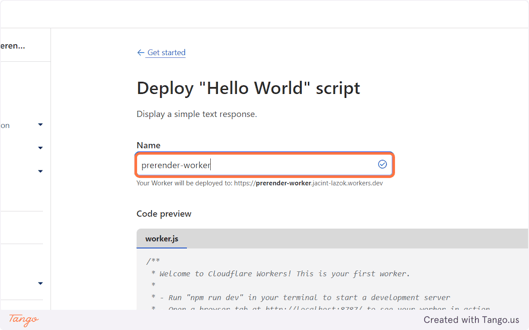
- Name your Worker (for example, prerender-worker).
- Click Deploy to create the Worker with the default Hello World template. You will replace this code in the next step.
Step 6: Replace the default code with the Prerender.io Worker script.
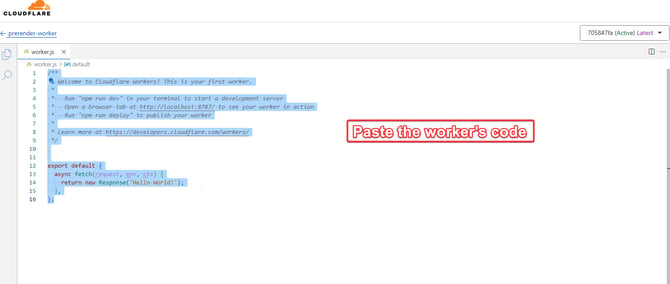
- After deploying, click Edit code to open the Worker editor.
- Delete the default Hello World code.
- Copy the Prerender.io Worker source code from this GitHub Repo and paste it into the editor.
- Do not deploy yet. You need to configure the route and environment variable first.
Step 7: Configure the Worker route.
The route determines which requests trigger the Worker. Go to your Worker's Settings > Domains and add a route.
Route pattern examples:
| Pattern | Matches |
|---|---|
example.com/* |
All pages on example.com only |
*example.com/* |
Both example.com and www.example.com and every domain that contains example.com |
blog.example.com/* |
Only the blog subdomain |
*.example.com/* |
All subdomains of example.com |
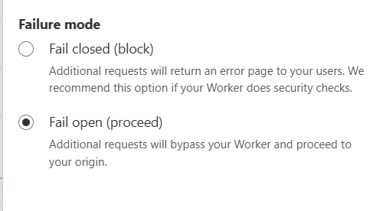
*example.com/*.Set the Failure mode to Fail open (proceed). This ensures that if the Worker encounters an error, requests still reach your origin and your site remains accessible.
- In your Cloudflare dashboard, Click Domains and select your website (the domain you are integrating).
- Go to Workers Routes, then click Edit.
- Click the Request limit failure mode link to expand the failure mode options.
- Set Failure mode to Fail open (proceed).
- Save the settings.
Step 8: Add your Prerender.io token as an environment variable.
The Worker reads your Prerender.io token from an environment variable. Without it, the Worker cannot authenticate with Prerender.io.
-
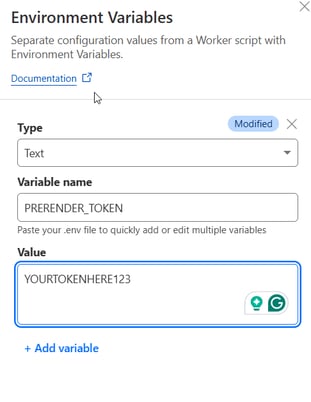
Go to your Worker's Settings > Variables and Secrets.
- Click Add.

- Set the type to Text.
- Set the name to exactly
PRERENDER_TOKEN(case-sensitive). - Paste the token you copied in step 1 as the value.
- Click Save.
Step 9: Deploy the worker
Return to the Worker code editor and click Deploy to activate the Worker with your route and environment variable.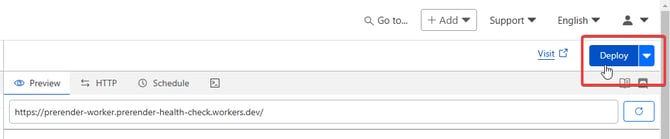
ℹ️ It may take a couple of minutes after deployment before the integration starts intercepting requests.
Step 10: Verify your integration
Already logged into Prerender? Once you have added the integration, select the Verify integration button at the bottom right of the screen and submit your domain to check that everything is working.
After deploying, confirm that Prerender.io is intercepting crawler requests on your domain.
-
Open Chrome DevTools (press Ctrl+Shift+J on Windows or Option+⌘+J on Mac).
-
Open Network Conditions (press Ctrl+Shift+P or Command+Shift+P and search for "Network conditions").
-
Under User agent, uncheck Use browser default and select Googlebot from the dropdown.
-
Navigate to your site and check the Network tab for the main document request.
-
Look for x-prerender-request-id in the Response Headers. If it appears, the integration is working.
You can also test from the command line:
curl -A "Googlebot" -I https://yourdomain.com
✅ The integration is working when you see the x-prerender-request-id response header and your domain shows Verified in Domain Manager.
Follow the steps in How do I verify my Prerender integration? to test your setup.
✅ Your integration is working when cached pages appear in your Prerender dashboard within a few minutes of your first crawler request, and Prerender response headers are visible in the verification tool.
If the integration is not detected, see Why does Prerender.io show "Integration not detected" after setting up Cloudflare? for a step-by-step diagnostic guide.
Not sure if the integration is configured correctly? Nexus, your AI integration assistant, can help. Open Nexus from your Prerender.io dashboard, describe your setup, and Nexus will guide you through verification.
Related articles
- Why does Prerender.io show "Integration not detected" after setting up Cloudflare?
- How do I verify if my Prerender.io integration is set up correctly?
- How do I allowlist Prerender.io's IP addresses?
- Available integrations
💬 Still need help?
If you're running into issues with your Cloudflare Workers integration, our support team can help you diagnose what's going wrong.
→ Contact us at support@prerender.io