
ℹ️ Prefer a guided setup? Nexus, your AI integration assistant, is built into your Prerender.io dashboard. Describe your tech stack and Nexus walks you through the right integration path step by step. This guide is for developers who want full control over their configuration.
TL;DR
Getting started with Prerender.io takes four steps: create your account, integrate Prerender.io with your website, configure your caching rules for query parameters, and submit your sitemaps. This guide walks through each step manually, giving you full visibility into how the integration works. Most setups are complete within an hour.
Next up: Get started with Nexus, your AI integration assistant - let Nexus walk you through your integration setup step by step
Why this matters
AI crawlers and search engines need to read your content to index it and include it in AI-generated answers and search results. Most modern websites are built with JavaScript frameworks that many crawlers cannot fully execute. Prerender.io solves this by rendering your pages in a headless browser, caching the result, and serving clean HTML to crawlers. Your website visitors are never affected.
How Prerender.io works
Prerender.io detects requests from AI crawlers and search engines and serves them a cached, fully rendered version of your page. This involves three steps:
- Crawler detection. Prerender.io identifies requests from bots like Googlebot, GPTBot, and ClaudeBot based on their user-agent strings.
- Page rendering. Prerender.io fetches your page, renders it in a headless browser, and caches the result.
- Serving cached content. Prerender.io delivers the cached HTML to the crawler, ensuring fast and accurate indexing.
Your website visitors experience your site normally. Only crawler requests are routed through Prerender.io.
Step 1: create your Prerender.io account.
- Visit Prerender.io and click Start For Free or Create an Account.
- Fill in the required information to create your account.
Step 2: integrate Prerender.io with your website.
Choose the right integration for your tech stack. Prerender.io must be integrated as close to the visitor as possible, typically via CDN or reverse proxy.
- Check the full list of available integrations to identify which guide to use.
- Follow the integration guide for your platform.
- Test the integration by changing your browser's user agent to a crawler (for example, Googlebot) and verifying that the pre-rendered page is served.
ℹ️ Not sure which integration to use? Open Nexus, your AI integration assistant inside your dashboard. Describe your stack and Nexus will recommend the right path and walk you through setup.
ℹ️ For detailed testing instructions, see How to verify your Prerender.io integration is working.
Prerender.io only serves pages to crawlers. Your website visitors are not affected.
Step 3: configure your caching rules for query parameters.
Review your query parameters to avoid wasting renders on low-value pages.
How this works: Prerender.io caches each unique URL individually. If two URLs share the same path but differ in their query parameters, Prerender.io treats them as separate URLs. This works well for parameters that influence the page content, but it leads to unnecessary renders when parameters do not affect content (for example, tracking codes or session IDs).
To address this, Prerender.io offers an option to ignore specific query parameters. When a request includes an ignored parameter, Prerender.io serves the base URL without that parameter. For example, if a crawler requests https://example.com/category?param=1 and param is set to be ignored, Prerender.io responds with the cached version of https://example.com/category.
To configure your caching rules:
- In your Prerender.io dashboard, navigate to Cache Manager, then Caching Rules.
- Choose one of the three options:
- Ignore specific query parameters. Exclude parameters that do not affect page content.
- Ignore all query parameters. Exclude all parameters unless specified otherwise.
- Only cache specific query parameters. Include only parameters that change page content.
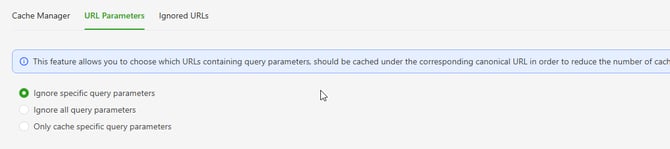
⚠️ Changes to caching rules take effect within an hour. Affected URLs are removed from the cache two hours after the update.
Step 4: submit your sitemaps.
Submitting your sitemaps to Prerender.io ensures your pages are pre-cached before crawlers request them. This eliminates cache misses and serves pages faster.
Why this matters: When a crawler requests a page that is not cached, Prerender.io fetches it from your server, renders it, and delivers it to the crawler. This is called a cache miss render and results in slower response times compared to serving a cached page. Pre-caching via sitemaps avoids this.
To submit your sitemap:
- In your Prerender.io dashboard, go to the Sitemaps section.
- Add your sitemap URL to allow Prerender.io to pre-cache your pages.
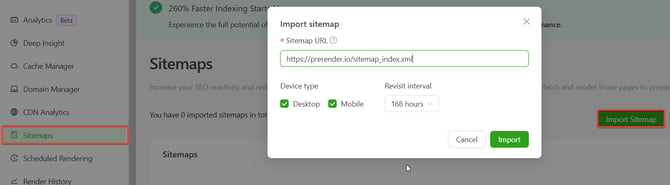
- Click Crawl Now to verify your sitemap is accessible and that pages are being cached. If the crawl is unsuccessful, you will see "Failed" in the Status column with a reason.
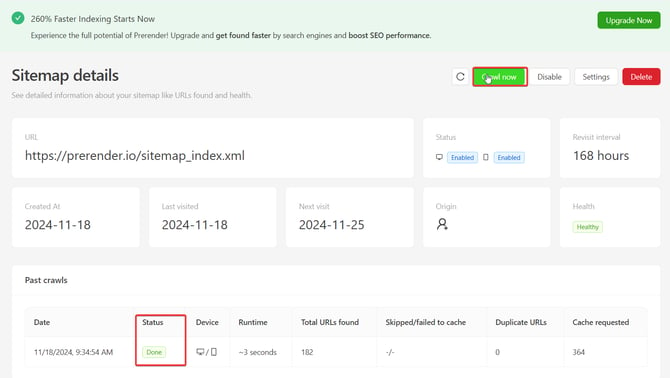
- Keep your sitemap updated. Prerender.io crawls your sitemap at the interval you configure and adds any new, uncached URLs to the cache. Pages already cached are not re-cached when the sitemap is recrawled.
ℹ️ For more details on sitemap configuration and troubleshooting, see How do I use Prerender.io's sitemap crawler?
Step 5: verify your setup is working.
Confirm that Prerender.io is correctly intercepting crawler requests and serving cached HTML.
- Open your Prerender.io dashboard and check that cached pages are appearing.
- Use the testing instructions in How to verify your Prerender.io integration is working to confirm pages are being served to crawlers.
✅ Your setup is working when cached pages appear in your Prerender.io dashboard within a few minutes of your first crawler request, and pre-rendered HTML is returned when you test with a crawler user agent.
Tips
- Do not block crawler access. Ensure your server or firewall settings do not block AI crawlers and search engine bots. This can prevent Prerender.io from serving cached pages.
- Integrate as close to the visitor as possible. Prerender.io should intercept requests at the CDN or reverse proxy level. See How does Prerender.io work? for a detailed guide.
- Avoid geo or IP restrictions. Geo-based or IP-based restrictions may prevent Prerender.io servers from accessing your site.
Related articles
- What to expect in the first 30 days after integrating Prerender.io?
- Get started with Nexus, your AI integration assistant
- How does Prerender.io work?
- How do I use Prerender.io's sitemap crawler?
- How to verify your Prerender.io integration is working
💬 Still need help? If you have questions about setting up your account, integrating Prerender.io, or configuring your cache, our support team can help. → Contact us at support@prerender.io