TL;DR
Because Lovable Free plan hosts your site on its own infrastructure (yourapp.lovable.app), Prerender.io connects through a Cloudflare Worker that sits in front of your custom domain. The Worker routes AI crawler and search engine requests to Prerender.io, while your website visitors are proxied transparently to your Lovable app. This integration takes around 30–45 minutes, assuming DNS propagation completes quickly.
What to Expect
This integration takes about 45 minutes. Prerender connects to your Lovable site through Cloudflare. Cloudflare sits in front of your domain and routes requests either to Prerender or to your Lovable app, depending on who is visiting the page.
For both Lovable setups, bots are routed to Prerender and receive pre-rendered HTML.
For free Lovable users, Cloudflare also proxies normal visitor traffic to your Lovable-hosted app. The current worker-custom-domain.js code injects the correct canonical URL and rewrites only redirects that point back to your Lovable upstream, which helps prevent login and OAuth redirect issues.
How it Works
| Browser or bot | Cloudflare | Prerender.io | Lovable |
|---|---|---|---|
| Visits your domain | Routes the request | Intercepts bot requests, serves pre-rendered HTML | Hosts your site, continues working as normal |
Your website visitors are unaffected. Cloudflare becomes the front door for your custom domain. The Worker also injects the correct canonical URL and rewrites redirects back to your Lovable upstream, which prevents login and OAuth redirect issues.
Not sure if this is the right integration for your setup? Ask Nexus, your AI integration assistant, inside your Prerender.io dashboard. Describe your stack and Nexus will confirm the right path.
Before you start
You will need:
-
Your Lovable hosted URL (example:
yourapp.lovable.app) -
Your custom domain (example:
yourapp.com) -
Your Prerender token (available in your Prerender account)
- Cloudflare account with your custom domain added (see setup instructions below)
Step 1: create a Prerender.io account and copy your token.
If you don't have a Prerender.io account yet, create one at prerender.io.
Once logged in, go to Security and Access in your Prerender.io dashboard and copy your token. You will need it in Step 5.
Step 2: create a Cloudflare account and add your domain.
If you don't have Cloudflare set up yet, complete this before continuing:
- Create a free Cloudflare account at cloudflare.com/sign-up.
- Add your root domain (example:
yourapp.com). - Review your DNS records in Cloudflare.
- Log in to your domain registrar and replace your nameservers with Cloudflare's nameservers.
DNS propagation can take a few minutes to a couple of hours. You don't need to wait before continuing. Your custom domain may be temporarily unreachable during this time, but your site stays accessible via your Lovable hosted URL (example: yourapp.lovable.app).
For full setup instructions, see Cloudflare's DNS setup guide.
Step 3: Create a Cloudflare Worker
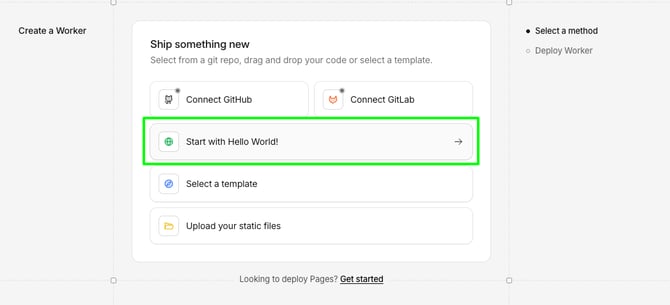
This step uses Cloudflare's browser-based inline editor. When creating your Worker, choose the quick-editor (single-file) path rather than a Git-connected template. The screenshots below reflect that flow.
-
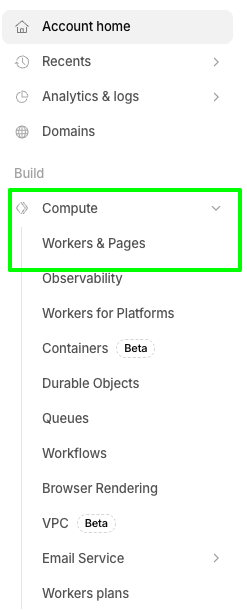
Log in to Cloudflare and go to Workers & Pages (you may find it under Compute or Compute and AI in the sidebar, depending on your account).
-
Click Create application

-
Select the simplest available single-file starter template (not a framework template and not a Durable Objects template). The exact label varies by account.
-
Name it something like
lovable-prerender -
Click Deploy
Step 4: paste the Worker code and deploy.
- In Cloudflare, go to Workers & Pages > your Worker (it may be under Compute or Compute and AI).
- Click Edit code (the button may read Edit or show a code icon — look for the inline browser editor entry point).
- Replace all existing code with the code from worker-custom-domain.js on GitHub.
- Click Save and deploy.
-
Step 5: add your Prerender.io token and Lovable upstream to the Worker.
- Open your Worker and go to Settings.
- Find Variables and Secrets.
- Add a secret for your Prerender.io token:
- Name:
PRERENDER_TOKEN - Type: Secret
- Value: your Prerender.io token

- Name:
- Add a variable for your Lovable upstream:
- Name:
LOVABLE_UPSTREAM - Type: Text (this value is not sensitive)
- Value: your Lovable hosted address (example:
https://yourapp.lovable.app)
- Name:
Step 6: attach your custom domain to the Worker.
Attaching your domain directly to the Worker is the recommended approach for custom domains and avoids certain CNAME-routing conflicts that can occur in multi-zone Cloudflare setups.
- In your Worker, open Settings.
- Click Add next to Domains & Routes.

- Select Custom domain.
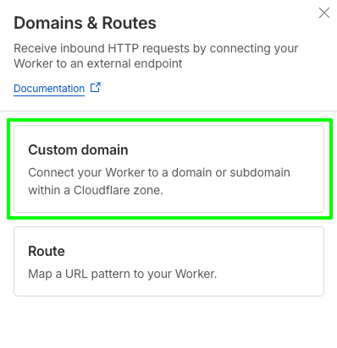
- Enter your domain. Add all variants you need, including
www.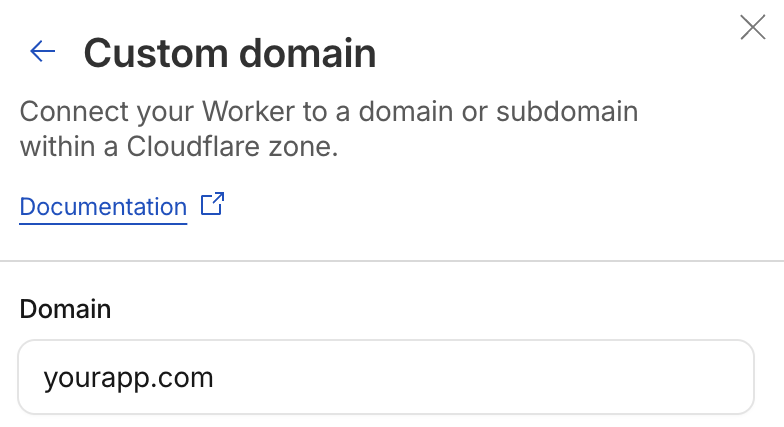
- Cloudflare creates the needed DNS records and SSL certificate automatically.
When complete, the Cloudflare DNS panel shows a Worker mapping for your domain.

Step 7: verify the integration is working.
Confirm Prerender.io is intercepting bot requests and serving pre-rendered HTML.
Option 1: simulate a Googlebot visit in Chrome. Follow these steps to change Chrome's user agent and check the response headers:
- Open Chrome DevTools (F12 or Cmd+Option+I).
- Open the Command Palette (Ctrl+Shift+P or Cmd+Shift+P) and search for Network conditions.
- In the Network conditions panel, uncheck Use browser default.
- Select Googlebot from the user agent list.
- Refresh the page and check the response headers for
x-prerender-request-id. If this header is present, Prerender.io is serving pre-rendered HTML to bots.
Option 2: use the dashboard verification tool. In your Prerender.io dashboard, go to the Get Started tab or Domain Manager and submit your domain for verification.
For full verification steps, see Verify your Prerender.io integration.
Your integration is working when the x-prerender-request-id response header appears on bot requests, or when your Prerender.io dashboard shows cached pages for your domain.
Related articles
- Verify your Prerender.io integration
- How Prerender.io works
- Available integrations
- How do I add multiple domains?
Still need help? If you run into issues during any step of this integration, our support team can help you troubleshoot. → Contact us at support@prerender.io