TL;DR
Domain Manager in your Prerender.io dashboard is where you add, monitor, and remove domains. Every domain on your account shares the same Prerender.io token. Add a domain, apply your token to its integration, and confirm the integration status shows Verified. To remove a domain, click the trash can icon. Removal permanently deletes the domain and all its cached URLs.
Next up: What to expect in the first 30 days after integrating Prerender.io? - learn what happens after your integration goes live and when to expect your first cached pages.
Why this matters
Without a verified domain in Domain Manager, Prerender.io cannot serve cached pages to AI crawlers and search engines. Unverified or missing domains mean crawlers hit your origin server directly, which can lead to slow responses, missed content, and reduced visibility in AI-generated answers and search results. Domain Manager shows you exactly which domains are active, how many URLs are cached per domain, and whether each integration is working.
What you see in Domain Manager
Each domain entry in the table shows four columns:
- Domain URL. The root domain being tracked.
- URLs. The number of individual URLs currently cached under that domain.
- Integration status. Whether the domain's integration is verified and active.
- Created on. The date the domain was added to your account.
ℹ️ Cached URL counts and metrics sync once every 24 hours. If a domain shows no cached URLs and has had no activity for more than 48 hours, it is safe to remove.
URLs vs renders
Your URLs count and your monthly renders count will look very different. Most URLs have two cached versions: one for desktop and one for mobile. Depending on your cache freshness setting, URLs may also be recached multiple times per month. Expect your render count to be noticeably higher than your URL count.
Adding a domain
Step 1: open Domain Manager in your Prerender.io dashboard.
Log in to dashboard.prerender.io and select Domain Manager from the left-hand navigation.
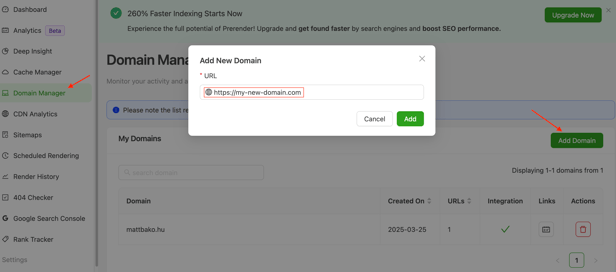
Step 2: enter your domain URL.
Click the Add Domain button above the table. Enter your domain URL in the input field, then click Add. You can add primary domains (example.com), additional brands (anotherdomain.org), and subdomains (shop.example.com).
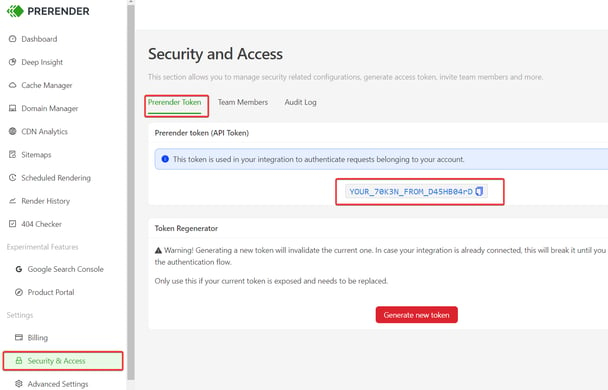
Step 3: copy your Prerender.io token.
In your Prerender.io dashboard, go to Security and Access > Prerender Token and copy your API token. Every domain on your account uses the same token.
ℹ️ [PLACEHOLDER. Screenshot: Security and Access page showing the Prerender Token tab with the token field and copy icon. Publisher: reuse original HubSpot image from article #5.]
Step 4: apply the token to your domain's integration.
Paste the token into the appropriate place in your integration for the new domain. Depending on your setup, this could be your reverse proxy configuration, your middleware, or your server code.
ℹ️ Each domain you add must be integrated individually using the appropriate guide. See the full list of Available integrations to find the right setup for your stack.
Step 5: verify the integration is active.
Return to Domain Manager and confirm your domain shows Verified in the Integration status column.
✅ Your domain is correctly connected when its integration status shows as Verified in Domain Manager.
Once a domain is correctly integrated, Verified in the Integration status column confirms the integration is active for that domain.
If the status shows as unverified, Nexus, your AI integration assistant, can help you diagnose and fix the issue. Open Nexus from your Prerender.io dashboard. You can also follow the steps in How do I verify if my Prerender.io integration is set up correctly?.
ℹ️ Each domain you add must be integrated individually using the appropriate guide. See the full list of available integrations to find the right setup for your stack.
Step 3: copy your Prerender.io token.
In your Prerender.io dashboard, go to Security and Access > Prerender Token and copy your API token. Every domain on your account uses the same token.
Step 4: apply the token to your domain's integration.
Paste the token into the appropriate place in your integration for the new domain. Depending on your setup, this could be your reverse proxy configuration, your middleware, or your server code.
ℹ️Each domain you add must be integrated individually using the appropriate guide. See the full list of Available integrations to find the right setup for your stack.
Step 5: verify the integration is working.
Return to the Domain Manager and confirm your domain shows Verified in the Integration status column.
✅ Your domain is correctly connected when its integration status shows as Verified in Domain Manager.
If the status shows as unverified, Nexus, your AI integration assistant, can help you diagnose and fix the issue. Open Nexus from your Prerender.io dashboard. You can also follow the steps in How do I verify if my Prerender.io integration is set up correctly?.
Not sure which integration to use for your new domain? Ask Nexus, your AI integration assistant, inside your Prerender.io dashboard. Describe your stack and Nexus will recommend the right path.
Adding multiple domains
You can manage multiple domains and subdomains under a single Prerender.io account. Repeat steps 2 through 5 for each domain you want to add.
⚠️ Settings apply to the entire account, not to individual domains. If you need different settings per domain, contact support@prerender.io to discuss your options. Render counters and dashboard charts reflect all domains in the account combined.
Removing a domain
⚠️ Removing a domain deletes it from your account and permanently removes all cached URLs associated with it. This action cannot be undone.
Step 1: confirm you no longer need the domain cached.
Before deleting, verify the domain is genuinely inactive. For example, it is a test environment, a decommissioned project, or it has shown no cached URLs for more than 48 hours.
Step 2: delete the domain and confirm.
Click the trash can icon in the Actions column next to the domain. In the confirmation modal, confirm your
.png?width=670&height=319&name=image-1738939793279%20(1).png)
✅ The domain is removed when it no longer appears in your Domain Manager table.
If the domain had a large number of cached URLs, deletion may take several minutes to complete. The domain disappears from the list once the process finishes.
Need to remove several domains at once? See How do I remove multiple domains from Prerender.io?.
Related Articles
- Available integrations
- How does Prerender.io work?
- How do I verify if my Prerender.io integration is set up correctly?
- Do 404 or 301 pages count towards my render counter?
- How do I remove multiple domains from Prerender.io?
Still need help? If your domain isn't showing Verified in the Integration status column, or you're unsure how to apply the token to a specific integration, our support team can help. → Contact us at support@prerender.io