How Does Cache Expiration Work in Prerender?
Cache expiration determines how often your pages are automatically recached, impacting SEO responsiveness and usage limits.
Overview
Understanding how cache expiration works is essential to maintaining up-to-date content in Prerender while managing usage efficiently. Cache expiration defines how long a cached version of a URL stays active before it's automatically refreshed. If your content changes frequently but cache expiration is set too long, search engines and users may see outdated versions of your site—impacting SEO and user experience.
Conversely, setting a very short expiration period can lead to high Prerender usage, potentially exceeding your plan limits.
Possible Causes / Scenarios
1. Cached Pages Not Updating Frequently Enough
If your pages are updated often but the cached version remains outdated, your cache expiration may be set too high.
2. Usage Limits Being Reached Too Quickly
If you are recaching too often—either automatically or manually—you may be consuming your Prerender usage quota too fast. This can be due to a very low cache expiration value.
3. Confusion Around Subscription Plan Limitations
Each Prerender plan has different allowable cache expiration ranges, and using a value outside of your plan's limit won't work as expected.
Prerender Plan Cache Expiration Ranges
Your plan determines the available range for cache expiration:
- Starter: 24 hours – 7 days
- Growth: 12 hours – 14 days
- Pro: 6 hours – 30 days
- Enterprise Plus: 6 hours – 30 days
You will not be able to select a value outside your plan's limits.
Adjusting Cache Expiration in Prerender
-
Log in to your Prerender dashboard.
-
Go to the Cache Manager section from the main menu.
-
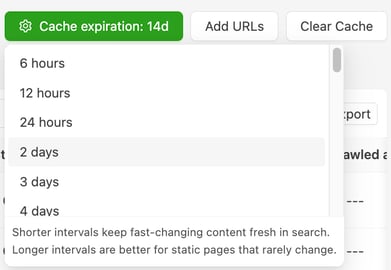
Click on Cache expiration on the right side of the interface.
-
Select your desired cache interval.

Consider how often your content changes. For news sites or frequently updated eCommerce pages, shorter expiration may be necessary.
Alternative:
Use the /recache API for Manual Updates
To gain more control and reduce usage, you can pair a longer cache expiration with manual recaching via the Prerender API.
-
When a page is updated on your site, trigger an API call to the
/recacheendpoint with the updated page's URL. -
This refreshes only the updated content without needing frequent auto-recache cycles.
-
This strategy helps maintain up-to-date content while optimizing usage.
- This way, you can lower your Prerender usage while also recaching your pages that change.
View API Endpoint Documentation here: API endpoints
Use Domain and Pattern-Based Cache Expiration
Domain-Level Cache Expiration
Set a single cache expiration policy that applies to every page under a domain. This acts as your default rule and ensures consistent recaching when no pattern-based rules are defined.
Pattern-Based Cache Expiration
Override the domain default for specific URL paths that change more frequently, such as blogs, product pages, or search results.
For more details, read our documentation here: Domain and Pattern-Based Cache Expiration
Additional Tips / Best Practices
-
Balance SEO and usage: Frequent recaching boosts SEO responsiveness but consumes more rendering minutes.
-
Automate smartly: Integrate the
/recacheAPI into your CMS or deployment process to auto-update specific pages as needed. -
Audit usage regularly: Monitor your Prerender usage to ensure you're within your plan’s monthly limits and make cache expiration adjustments accordingly.
-
Avoid unnecessary recaching: Static content that rarely changes can use higher expiration settings without SEO drawbacks.
Get Support
Still have questions or need help? We’re here for you!
If you’ve followed the troubleshooting steps and still can’t resolve the issue, feel free to reach out to our support team. You can contact us via:
- Email: support@prerender.io
- Support Ticket: Submit a ticket
To help us resolve your issue as quickly as possible, please gather and include any relevant information, such as:
- Error messages you're seeing
- Steps you've already taken to troubleshoot
- Screenshots or screen recordings (if applicable)
Providing these details up front will help our team diagnose the problem more efficiently and get you back on track faster.
