TL;DR
This guide is for Lovable paid plan users with a custom domain routed through Cloudflare. You'll create a Cloudflare Worker using the worker-subscriber.js script, attach it to your domain route, and configure it with your Prerender token — AI crawlers and search engines will then receive fully rendered HTML. If you're on the free Lovable plan using a yourapp.lovable.app URL, use the Lovable free plan guide instead.
Step 1: Confirm you're on a Lovable paid plan and your project is published
Custom domains in Lovable are only available on paid plans. Before continuing, confirm:
- You are on a Lovable paid plan
- Your Lovable project is already published
- You have a Cloudflare account with permission to create and manage Workers
If any of these aren't in place, complete them before moving to Step 2.
Step 2: Connect your domain in Lovable using the Advanced proxy option
In your Lovable project settings, connect your custom domain using the Advanced option: Domain uses Cloudflare or a similar proxy.
Then, in Cloudflare, ensure the CNAME record for your domain is set to Proxied (the orange cloud icon) — not DNS Only. This integration only works when Cloudflare is actively proxying your traffic.
For Lovable-specific steps, refer to the Lovable custom domain documentation.
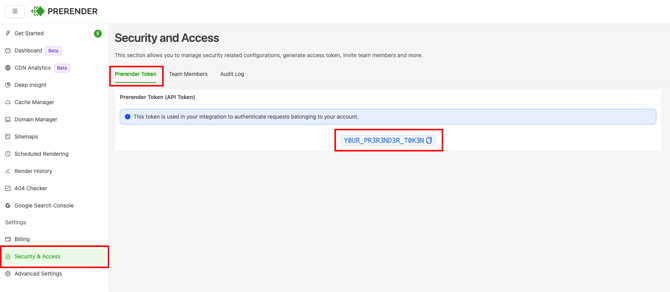
Step 3: Copy your Prerender token from your dashboard
Open your Prerender dashboard and copy your Prerender token from the Security and Access menu. You'll need it in Step 8.
Step 4: Allow AI crawlers in your Cloudflare settings
⚠️ Cloudflare automatically blocks AI training crawlers on newly added domains. If you want AI crawlers to index and cite your content, you must explicitly allow them — otherwise your Prerender integration will serve rendered HTML that AI crawlers never receive.
To allow AI crawlers:
- Open your Cloudflare dashboard and select your domain from Account Home
- On the Overview page, find Control AI crawlers and set it to allow
For more detail, see Cloudflare's AI bots documentation.
Step 5: Create a new Cloudflare Worker
- In your Cloudflare dashboard, click Compute and AI and select Workers & Pages from the left sidebar
- Click Create Application at the top right and select Start with Hello World!
- Enter a name for the worker — for example,
prerender-worker— and click Deploy
Step 6: Replace the default code with the Prerender worker script
- Click Edit Code at the top right of the worker page
- Select and delete all the default code in the editor
- Open
worker-subscriber.json GitHub, copy the entire script, and paste it into the editor - Click Deploy
⚠️ Use worker-subscriber.js for this integration — not worker-custom-domain.js. Using the wrong script is the most common cause of the "Prerender Integration Not Detected" error on Lovable custom domain setups.
Step 7: Configure the worker route
- Go to the worker Settings tab
- Under Domains & Routes, click Add Route
- Enter a route pattern that matches your domain — use the table below to choose the right format
- Set the failure mode to Fail open (proceed)
- Save the setting
| Website address type | Route pattern |
|---|---|
| Root domain only | example.com/* |
| www only | www.example.com/* |
| Both with and without www | *example.com/* |
| Any subdomain | *.example.com/* |
| Specific subdomain | blog.example.com/* |
| Multiple subdomains | (sub1|sub2).example.com/* |
Step 8: Add your Prerender token as an environment variable
- In the worker Settings tab, go to Variables and Secrets
- Click Add Variable
- Set Type to Text
- Set the variable name to
PRERENDER_TOKEN - Paste the Prerender token you copied in Step 3 as the value
- Save and deploy
Step 9: Deploy and verify your integration
Click Deploy to push the final configuration. The integration may take a couple of minutes to become active after deployment.
Then confirm Prerender is correctly intercepting crawler requests by running:
curl -v -A googlebot https://www.yourpage.com/
Look for x-prerender-request-id in the response headers.
curl response contains x-prerender-request-id in the response headers and returns fully rendered HTML. Cached pages should appear in your Prerender dashboard within 2–5 minutes of the first crawler request.If you see the "Prerender Integration Not Detected" error, work through this checklist:
- Your domain is live in Lovable
- The domain was connected in Lovable using Advanced → Domain uses Cloudflare or a similar proxy
- The CNAME record in Cloudflare is set to Proxied — not DNS Only
- The worker is attached to the correct hostname or route
PRERENDER_TOKENis present and set to a valid value- You used
worker-subscriber.js, notworker-custom-domain.js
For the "Prerender Integration Not Detected" error specifically, see What should I do if I receive a "Prerender Integration Not Detected" error?.
💬 Still need help?
If your Cloudflare Worker integration isn't behaving as expected after following these steps, our support team can help diagnose the issue.
→ Contact us at support@prerender.io